Showing posts with label 3D modeling. Show all posts

Tuesday, 2 December 2014

Oysterworld - Disguising polygons with hand painted textures

Published at Oysterworld blog
When it comes to creating textures for relatively low poly models in game, you have the freedom to fake detail when necessary. The idea is to create an illusion with your paint work and make it seem like the object you are creating a texture for has far more geometry and detail than it actually does in polygons. This is not far from Street Art Illusions where it tricks viewers in seeing a massive hole in the ground where there is just flat road.

Some artists seem to like following the edge of the polygons of their UVs when they paint their textures, this may be because it seems right to follow when you've modeled them purposely to be the edge of a material/object, but a few tricks can improve the shape and look of the object- especially if the surface they are on is relatively flat.

I've created a padlock with an unfinished texture to show you the difference it makes to cut corners (literally and not figuratively).


The freedom of this style is you can paint all the detail you want in spite of the geometry. When painting your texture, try your best to treat it as a painting, and not worry so much about the what geometry you have modeled. It will most likely turn out better than you expect.


Thursday, 3 January 2013

Sculpt study of David WIP01

Joined a cool face study with some polycounters on G+, directed by +Joseph March :)
We're doing these bit by bit every session, progress can be found on this polycount thread.

Here's my first progress shot of David's head. More to come soon!

Sunday, 2 December 2012

Victorian Bedroom- Further Progress

Took my bedroom scene from UDK and placed in Maya 2012, rendering with viewport 2.0. Lighting is SO. MUCH. BETTERRR.

Monday, 15 October 2012

A New Roof (WIP)

I've been trying something new with zbrush, making tilable textures and trying to reuse uv space. Overlapping UVs yes. Since I was actually taught not to do that >_>...

Wednesday, 22 August 2012

Victorian Bed Diffuse/Spec WIP

There really wasn't much to do in terms of the Diffuse Texture or Spec. A lot of the work was done from the normals and AO, even the SPEC brought it to life. All that's left is the aging process. Thought I'd post it looking brand new... also maybe a different bed cover, that looks quite boring!


Sunday, 19 August 2012

Bed Normal/Ambient Occlusion maps baked

EDIT: I improved the shape, polycount and everything, also was too dull to realise marmoset wasn't using the AO. Hurp Derp. You can see the difference by comparing them:


---OLD--
Finally, I thought I'd never get this done. I spent a good few hours trying to bake the maps. Xnormal proved to be much faster, but for a few bits like the drapery, it didn't seem to recognize which side it was meant to bake. So then I had to open up Maya and painstakingly wait for the viewer to actually catch up. Anyhow, the diffuse is coming soon, I'm thrilled to have this complete.

Thursday, 16 August 2012

Bed WIP

Been working on this for a little while, it doesn't help that I had trouble with baking parts of the map. I decided I'd do each part separately to prevent Maya from crashing! So on the left is what I'm doing in Zbrush at the moment, and on the right is a marmoset render showing off the finished bedposts.


It's a pain, because I made the mistake of using dynamesh and then turning it off which prevented me from going back in sub-divisions. It was also way too high poly even after I halved the polycount. So... lesson learned. ><

Thursday, 9 August 2012

Room: lighting improvement

Had enough time to mess with the lighting a bit more, added a lighting importance mass, ambient occlusion to the level and some items like candles. I removed the chandelier because it really got in the way and didn't look pretty. Just not sure if the changes made much difference.

Wednesday, 8 August 2012

Dissonance: Room improvement

So I've been improving some items for the room, I'm still in the middle of it, here's a few screenshots. I've shrank it down because it was very big before.


Saturday, 4 August 2012

(Boring) Cabinet model

I've improved this model more:


Then... altered the texture again.

Wednesday, 1 August 2012

Cabinet Model WIP

Today I was feeling a bit down, so my progress has been slow with this. I scrapped my old cabinet model because it was so bad and started again. Got some references too. It looks better (much better than my old one).

I'm pretty stuck on how I should alter the geometry on the feet of the legs... they take up 360 odd tris alone.


Monday, 30 July 2012

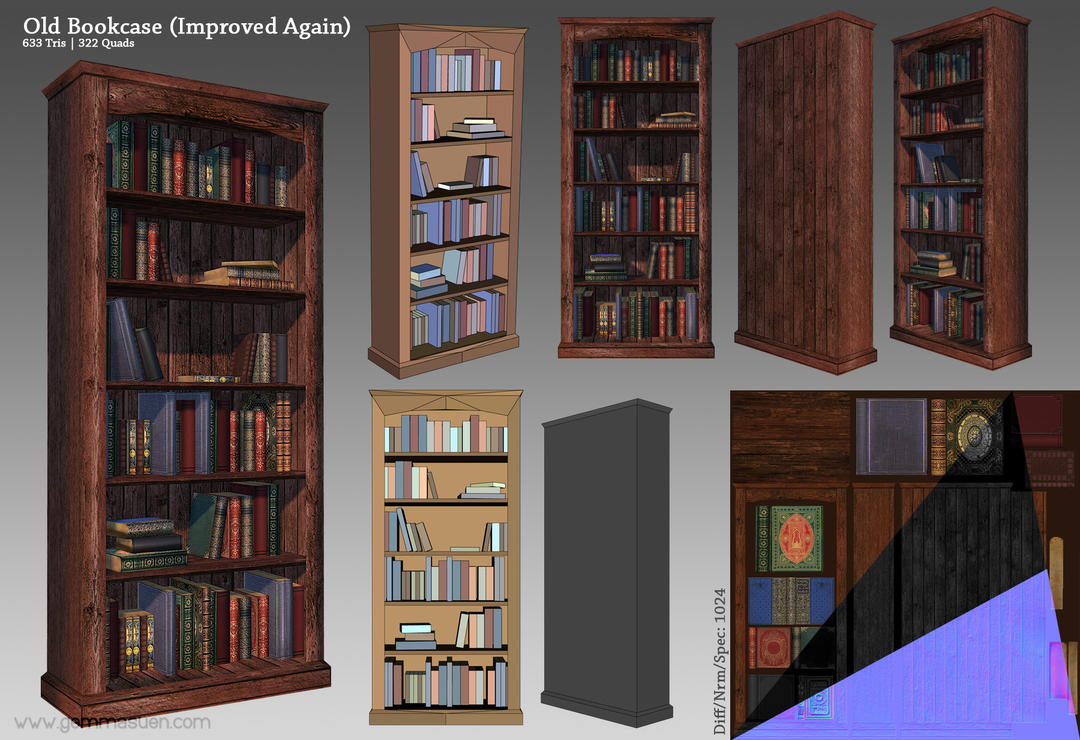
Bookcase, an improved model

I made this not so long ago, after a bit of feedback I went back and halved the poly count from 1321 Tris/716 Faces to 633 Tris/322 Faces. Thought I'd keep it posted here for comparison.

Old version: 1321 Tris/ 716 Faces


New version is also clearer because I was really silly with the UVs last time.

New Version: 633 Tris/ 322 Faces
Final Version:
Edited the Specular map and normals.


Saturday, 21 July 2012

Sci-Fi Soldier Model WIP03

It's been a busy few days, as I had my graduation two days ago :)
Here's the base mesh ready for zbrush. I also took such a long time on the hands! Damn appendages and their awkward edge flow.
The hands took me a day! But I think I understand how to do it quicker next time.
Finished, and added some edge loops to create a more even square mesh in certain areas.


Friday, 13 July 2012

Sci-Fi Soldier Model WIP02

I got some feedback saying he needs a bit of bulking up. I tried to shift a few polys, but I think most of the bulking up will have to be in Zbrush. :)

Sci-Fi Soldier Model WIP01

I've done a bit of modelling, it's going rather slowly. I expect I have really poor technique when it comes to modelling. Hopefully I can learn from this.


Starting with pieces separately, and joining later.

Improved topology and progressing further


Sunday, 8 January 2012

Applejack's Apple Hunt!

Here's a game just finished by Christian Skogen and I, it took a few months on and off.  He coded the engine from scratch with C++ and LUA, and that alone took him a few months. This is a great achievement for him, :D and I'm sure he'll qualify for the Blitz Open Day.

Code: Christian Skogen
Assets (except for sky dome): Gemma Suen (me)
It should work for Windows 7 and Windows XP, since he had to optimise it for XP especially.

Download Here!

Thursday, 5 January 2012

BLITZ Open Day soon

Blitz Open Day is peering around the corner. It's a chance for university game orientated students like myself to get a better insight to the games industry, and this would be wonderful to qualify for.
By qualify, I mean you need to prove your worth by submitting one of the following: 2D, 3D, Animation, Audio, Games Design or Programming.

I initially didn't think my work would be good enough to submit, since I heard from some friends that they pick only the top 100 of each field or something like that. But they have also convinced me to give it a shot...


This is a collection of work from my Major Project: Dissonance. It's a game concept I need to design and partially complete by the end of this academic year.


I also helped out my boyfriend with his submission, here is a small preview:

Thursday, 19 May 2011

Group Work: Level Design

Today we had our last presentation of the academic year, showing our group level design. It wasn't meant to be finished, and just required us to make a game level that was playable. In the end I think we did well, although I regret not putting more time into it: I modelled a few assets and the character (textures and rigging too). Here are the concepts and video showing a demo of the level:
Concept of our level Asguard
Concept of main character Loki

Saturday, 30 April 2011

ORZ: Multiple channel complications and UDK

One UV map, two Separate textures placed on two sets of selected faces.....
...equals UDK to display it properly.... ORZ
Two days ago I asked for a lecturer's help on trying to get my textures to show correctly on UDK, the problem was that the material channels were never showing up, there would be one less, and one of the ones that did appear would be displaying the materials wrongly. For the pas two weeks I dibbled and dabbled with this problem, looking for tutorials and forums that had discussed problems that were on tangent with my own. I had wanted to use two textures on one model, and I figured have two separate uvs was the right way about it- and according to many sources it was. I just couldn't get it to work.

Today, I had finally given up, after trying to use 3Ds max and realising there was no time- I just merged the two uvs (outer part and inner part of the chapel) by first separating the model into two pieces and copying/pasting their uvs on 'map1' (original uv map). I combined and merged my two pieces back into one whole, and noticed that the materials were being displayed correctly still. This reminded me of what a friend had tried to explain to me, his methods of using two textures in udk. So I exported and re-imported the bastard into udk- low and behold : it was working fine, had two correctly displayed channels with the two very same textures i had tried to apply- nothing was ammiss.

So tell me- world-of-Maya-and-overly-complicated-software..... WTF?